| Installation Steps |
| 1. Create
your database on your database server (skip to step
2 if you are using the supplied Microsoft Access* database). Simply
create a new empty database in either Microsoft SQL Server or MySQL |
| 2. Create
an ODBC data source to your database, the DSN
name is set to mail-list by default and this is defined
in the Application.cfm page in the root level of the MailList directory. |
| 2a. Copy
the maillist directory to your web site. |
| 2b. Browse
the setup page located in the maillist/setup directory,
for example http://www.yourdomain.com/maillist/setup. If you have browsed
to this directory you should see the screen below. |
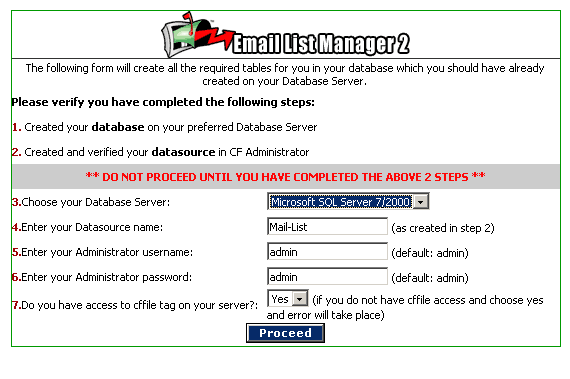 |
| 3. Choose
your database, select your chosen database (currently supported
databases are MSSQL, MySQL and Access*) |
| 4. Enter
your data source name,
this is the name of the data source to your newly created database or to
the supplied Access database you created above at step 2 (default is
"Mail-List") |
| 5. Enter
the main system administrator login,
enter the username you wish (as system administrator) to login with. Please
note this login will have full administration rights to the application
and all settings. (default: admin) This can be changed later within
the application at any time |
| 6. Enter
the main system administrator password, enter the password
you wish to assign to the username above (default: admin) This can
be changed later within the application at any time |
7. Select
whether you have cffile access,
if you are able to utilize cffile on you web server select "Yes".
The point of this step is to update the main "Application.cfm" file
to reflect the name of your data source as set in step 4 above.
** If you select NO here as you do onto have access to cffile
you must manually update the "Application.cfm" file in at
the root level of
the maillist directory, open it and update line 4 <cfset DSN = "Mail-List"> with
your data source name. |
Once you have everything correct press the "Proceed"
button. If you have selected to use a database server (either MSSQL or
MySQL) then the next screen will report to you the success of creating
all the required tables and default data required for the application
to run. If any errors are reported in creating any tables you may wish
to manually delete all tables in your database and repeat process as
there may have been a database issue.
|
| ***
POST INSTALLATION STEPS *** |
| Upon successful setup of your database you will be supplied
the link to login to the system using the username and password you created
above. It is strongly suggested you first go to the Global
Settings screen (last option on the side navigation menu) and update
all the settings in there as per your specific installation. |
* Microsoft Access is provided for testing and development
purposes, we strongly suggest not using it in a production environment.
We have not
stress tested our application using Microsoft Access nor do we offer support
using it in a high usage production setting |